Triage an incoming community report
Open the incoming report queue
Section titled “Open the incoming report queue”- Open Command → Community Reporting.
- Find Incoming community reports.
- Use the status filter to view Awaiting review, Under review, Linked or Dismissed / history.
- Select Open beside a report to expand its details.
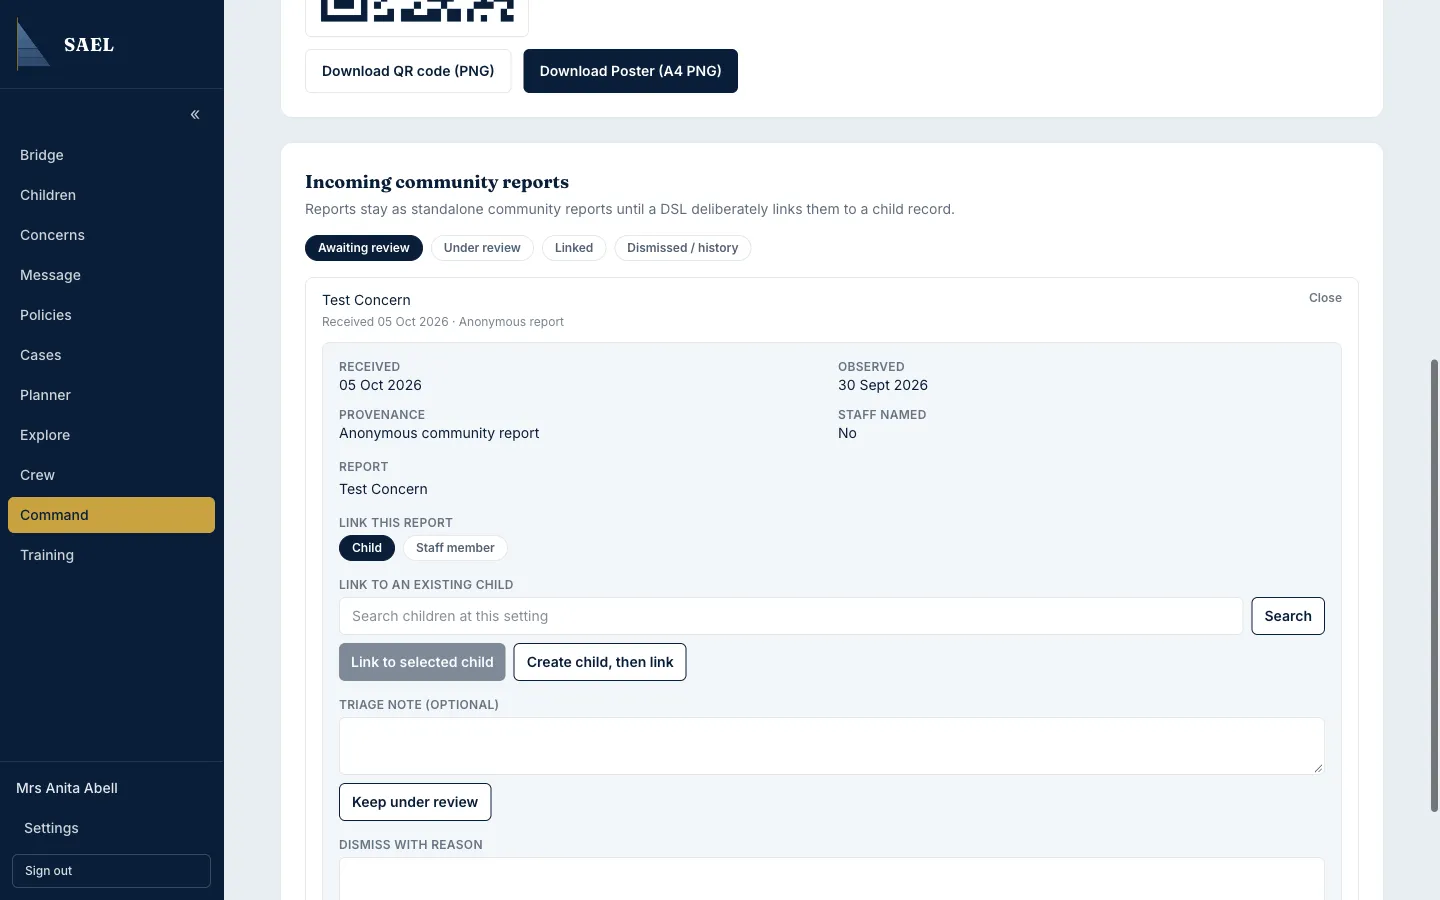
- Read the received date, observed date, provenance, reporter details where available and the report text. Anonymous reports are identified as anonymous.
- Review the report as a standalone report first. It is not automatically part of a child’s record just because a child is mentioned.
Keep the report under review
Section titled “Keep the report under review”- Read the report and decide whether you need more information before linking it.
- Enter a Triage note (optional) to record the review context.
- Select Keep under review.
- Check that its status is now Under review and that the note is displayed.
Link the report to a child
Section titled “Link the report to a child”- Under Link this report, select Child.
- In Search children at this setting, enter a name or identifying text.
- Select Search and wait for the matching children.
- Review the results and SAEL numbers. Select the correct child.
- Enter a triage note if it will help explain the decision.
- Select Link to [child name].
- Confirm that the report now shows as Linked and that the child name and SAEL number are correct. Use Open child record to inspect the linked profile if needed.
If the child does not yet have a SAEL profile and it is appropriate to create one, select Create child, then link. Complete the normal Add Child workflow, including any duplicate notice; do not create a duplicate profile solely to attach the report.
Link the report to a staff member
Section titled “Link the report to a staff member”- Select Staff member under Link this report. This option is disabled when staff safeguarding is switched off for the setting.
- Enter a name in Search staff at this setting.
- Select Search.
- Select the correct staff member from the results and verify the role/name.
- Enter a triage note if required for context.
- Select Link to [staff member name].
- Check the report’s linked status afterwards.
Dismiss a report
Section titled “Dismiss a report”Use the Dismiss with reason area only when you have reviewed the report and have a justified reason that it should not be linked or progressed. Enter the reason and select the dismiss action. The original report is retained in full for audit, and the Dismissed / history queue shows who dismissed it, when and the reason.
Community reporting is not an emergency response service. Act through your setting’s safeguarding procedures and external agencies where needed; do not wait for a community portal workflow or SAEL notification to address immediate risk.